How to create a Digital ID Signature
To sign a PDF document or form, you can type, draw, or insert an image of your handwritten signature. You can also add text, such as your name, company, title, or the date. When you save the document, the signature and text become part of the PDF.
Note: You can also capture a picture of your signature on mobile using Adobe Acrobat Reader mobile app and save it in Adobe Document Cloud so that it's synced and available for use across your desktop and other mobile devices. For more information, see Capture your signature on mobile and use it everywhere.
- Open the PDF document or form that you want to sign.
-
Click the Sign icon  in the toolbar. Alternatively, you can choose Tools > Fill & Sign or choose Fill & Sign from the right pane.

-
The Fill & Sign tool is displayed. Click Fill and Sign.

-
The form fields are detected automatically. Hover the mouse over a field to display a blue box. Click anywhere in the blue box, the cursor will be placed at the right position automatically. Type your text to fill the field.
 Hover the mouse to display the detected text field
You can choose your desired color to fill the PDF form. Click the color button in the Fill & Sign menu and choose your desired color.

By default, the signature color is black. To retain the default color of the signature, make sure the Retain Original Color For Signature option is unchecked.
Note: For more information on filling your form, see Fill out your PDF form.
-
Click the Sign icon  in the toolbar, and then choose whether you want to add your signature or just initials.

If you have already added signatures or initials, they are displayed as options to choose from.
-
If you've already added your signature or initials, just select it from the Sign options, and then click at the place in the PDF where you want to add your signature. Skip to the next step.
If you are signing for the first time, you see the Signature or Initials panel. Below is an example of the Signature panel.

You can choose to type, draw, or import a signature image. Added signatures and initials are saved for future use.
- Type: Type your name in the field. You can choose from a small selection of signature styles; click Change Style to view a different style.
- Draw: Draw your signature in the field.
- Image: Browse and select an image of your signature.
- Save Signature: When this check box is selected, and you're signed in to Acrobat Reader or Acrobat, the added signature is saved securely in Adobe Document Cloud for reuse.
Click Apply, and then click at the place in the PDF where you want to place the signature or initial.
-
To move the placed signature or initial, click the field to highlight it and then use the arrow keys. To resize or delete the field, use the options in field toolbar.
Note: If you want to use an image as your signature:
- Sign your name in black ink on a clean, blank sheet of white paper. Sign in the middle of the paper so you don't photograph or scan the edges.
- Photograph or scan your signature. If you are taking a picture of your signature, make sure that the page is lit and that no shadows fall across the signature.
- Transfer the photo or scan to your computer. Acrobat/Reader accepts JPG, JPEG, PNG, GIF, TIFF, TIF, and BMP files. You do not need to crop the image. Acrobat/Reader imports just the signature if the photo or scan is fairly clean.
Create a self-signed digital ID
Sensitive transactions between businesses generally require an ID from a certificate authority rather than a self-signed one.
-
In Acrobat, select the hamburger menu  (Windows) or Acrobat menu (macOS) and then choose Preferences.
-
In the Categories list on the left, select Signatures. On the right, select More for Identities & Trusted Certificates.
-
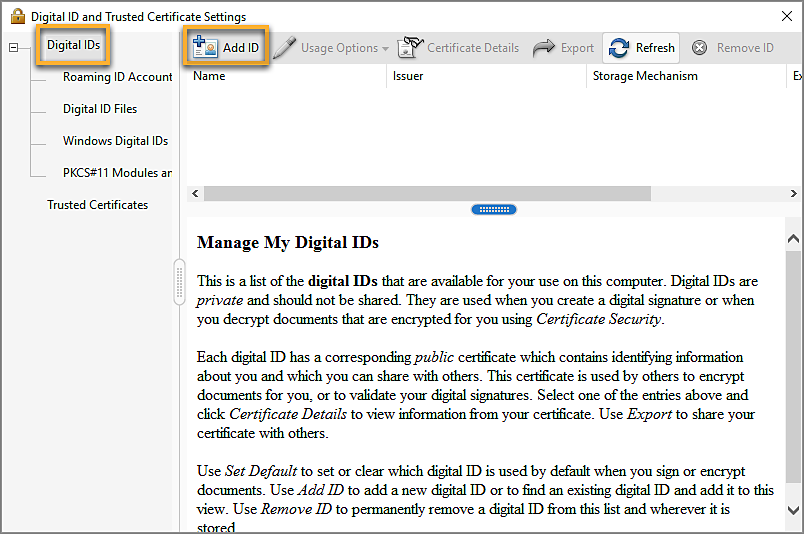
Select Digital IDs on the left, and then click the Add ID button  .
.
-
Select the option A New Digital ID I Want To Create Now, and click Next.

-
Specify where to store the digital ID, and click Next.
-
Select New PKCS#12 Digital ID File

-
Do the following:
- Type a name, email address, and other personal information for your digital ID. When you certify or sign a document, the name appears in the Signatures panel and in the Signature field.
- Organizational Unit: Your Department
- Organization Name: Santa Fe College
- Choose an option from the Key Algorithm menu. The 2048-bit RSA option is more secure, 1024-bit RSA is more universally compatible.
- From the Use Digital ID For menu , choose whether you want to use the digital ID for signatures, data encryption, or both.
- Click Next.

-
Do the following:
- Type a password for the digital ID file. For each keystroke, the password strength meter evaluates your password and indicates the password strength using color patterns. Reconfirm your password.
- The digital ID file is stored at the default location as shown in the File Name field. If you want to save it somewhere else, click Browse and choose the location.
- Click Finish.
-

If a digital ID file with the same name exists, you're prompted to replace it. Click OK to replace, or browse and select a different location to store the file.
-
The ID is created. You can export and send your certificate file to contacts who can use it to validate your signature.
